

According to Camila Coelho, it’s already part of her daily life to use the app to inspire other people, especially in relation to her personal style. The truth is that influencer driven buying habits have steadily risen over the years. And this is how many people see Instagram today: a way to choose what to buy.
Since the launch of the Instagram Shopping feature, buying became even easier, all it takes is a few taps on your phone. The general idea of in-app purchases completely changes the way we look at sales opportunities on Instagram.
So if you do have a product/service and want to increase your sales online, keep on reading.
What is Instagram Shopping?
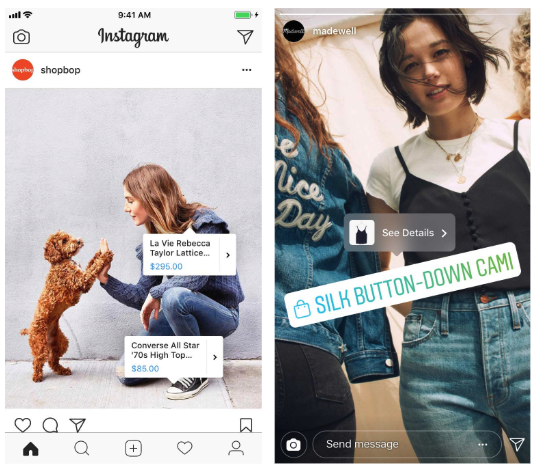
The Instagram Shopping feature aims to give brand accounts more room to sell within the app in the most obvious way: tagging products in their own posts.
The tagging capability creates a link between your physical product or service with your content that is already available on Instagram. If own an e-commerce, for example, you now can work with real purchases on Instagram without having to take the customer to multiple external pages or using the good old “link in bio” strategy.
All this by doing a simple tagging in your post. Sounds like a dream, doesn’t it?

How do I use this feature?
The feature is currently available for Instagram Business accounts, countries and website builders authorized by the service only. If you fill these criteria, you will be able to tag products in posts for both Feed and Stories.
Before you start this process, keep in mind two very important steps:
- Create a Facebook page to link to your Instagram account/store.
- Follow Facebook’s business guidelines and product merchant agreement closely.
Setting up your shop
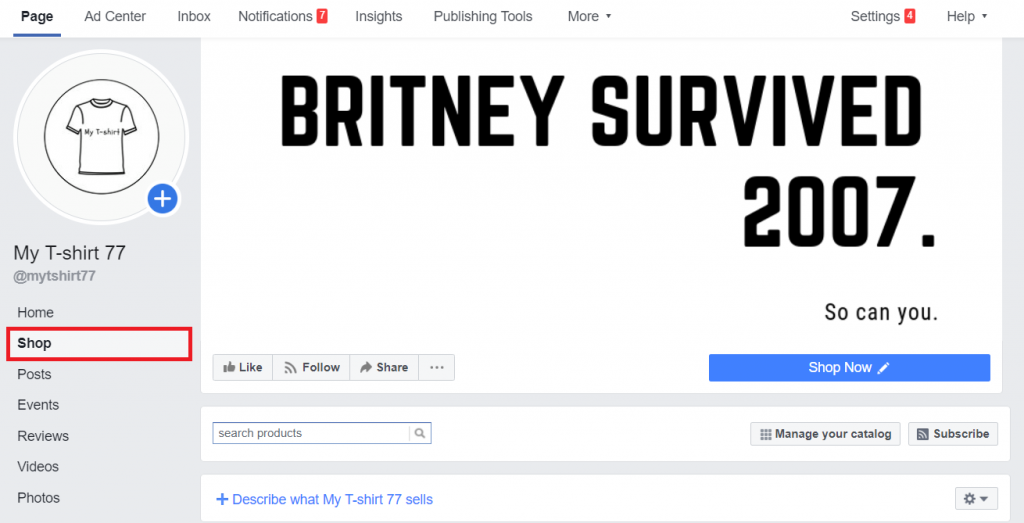
We created an account from scratch (@mytshirtstore77) to do this tutorial, filled it with some unique content and specific information that a real business must have to gain approval.
Instagram is still heavily dependent on the information it shares with Facebook, so it may sound weird at first but the most important step for your store to get approval starts by creating a product catalog on Facebook. According to Facebook itself, this catalog can be created and managed through the Business Manager tool, a Facebook store page or other platforms such as BigCommerce and Shopify.
There are a few ways to set up your shop on Instagram and unlock your product tagging capabilities: although you’ll really only need one, below I’ll show you how to set up your shop in three possible ways.
Using your Facebook Page
Go to your Facebook Page and enable the shopping feature.
Some accounts already have it enabled in the sidebar, but if your page doesn’t, click on Settings. Then select “Templates and tabs”.
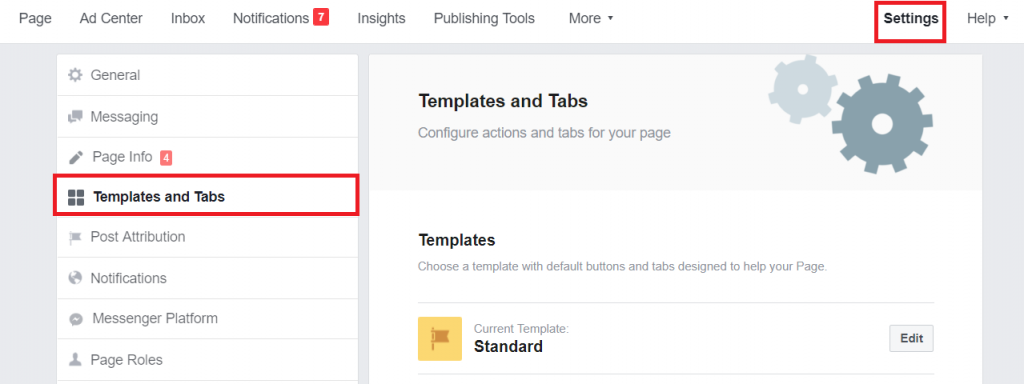
Click “Add a Tab” on the bottom menu and the Shop option will be there waiting to be activated.
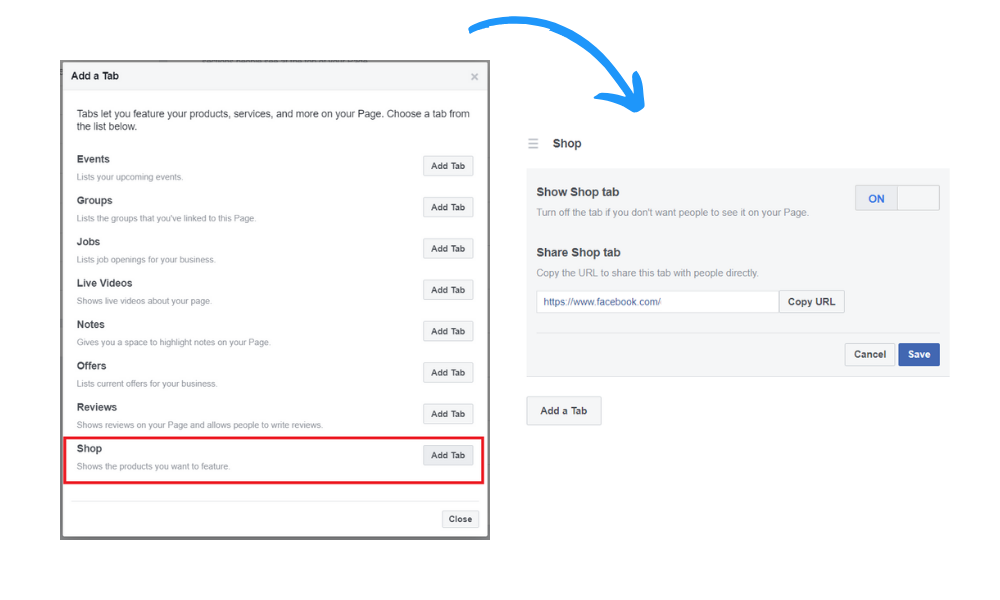
After adding this tab, you need to enable the function that makes it visible on the page. The store tab will be visible on the homepage, over the right corner.
Before you start the whole process of filling out catalogs, you’ll need to set up the Store through the Facebook section, which is basically the reaffirmation that you agree to all of the Facebook Product Merchant Agreement.
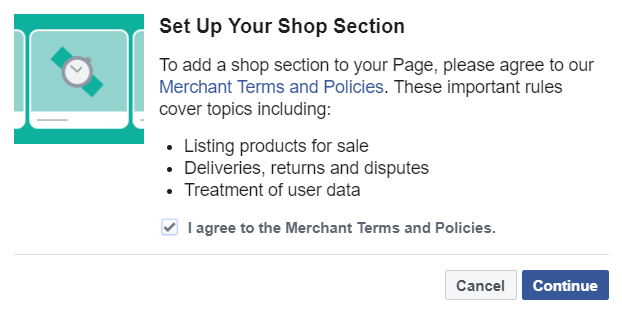
After clicking continue, you will have two options for checkout: people can contact you to purchase the product or checkout through an external link.
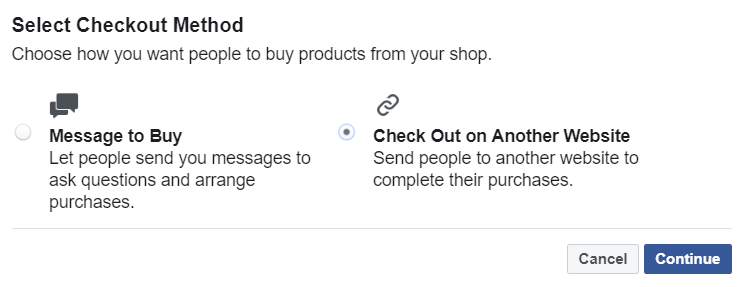
To close deals more easily, we suggest that you use the external link option, which will process your entire payment without having to contact the customer to submit a payment link.
Please keep in mind that the “Message to Buy” option will not fit your business eligible for the Instagram Shopping feature. After selecting the checkout method, you won’t be able to change it unless you delete and redo this whole process.
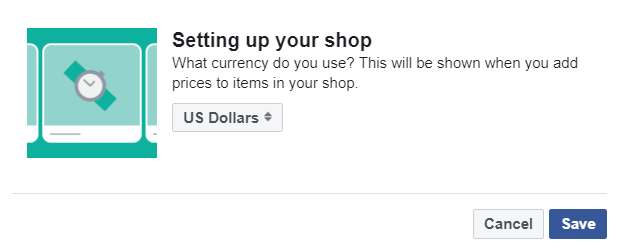
After choosing the currency, your store will be ready to receive products.
Using your Facebook Business Manager
This is probably the best way to set up we could recommend.
Since Facebook does not disclose what’s the specific criteria for creating a valid store, we believe the closer to a business account, the easier it is to get approval.
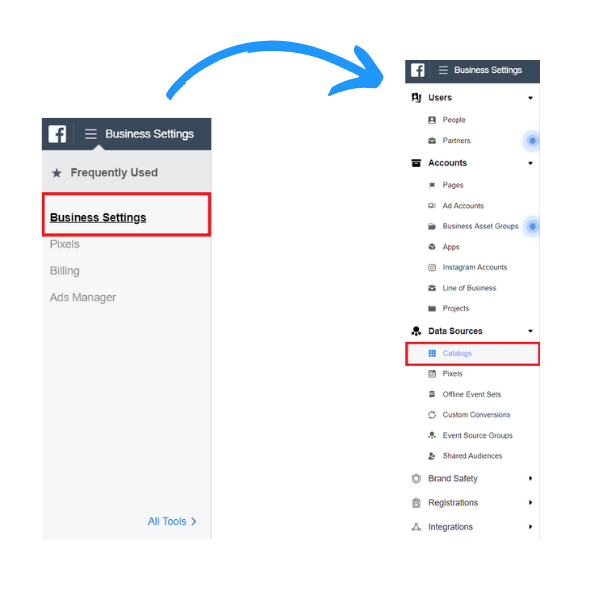
Enter your Facebook account and using Business Manager, click Business Settings and then select the Data Sources menu.
You will see several options, but what you are looking for is Catalogs.
If you don’t have any catalogs, click Add, which is right on the center button of the page.
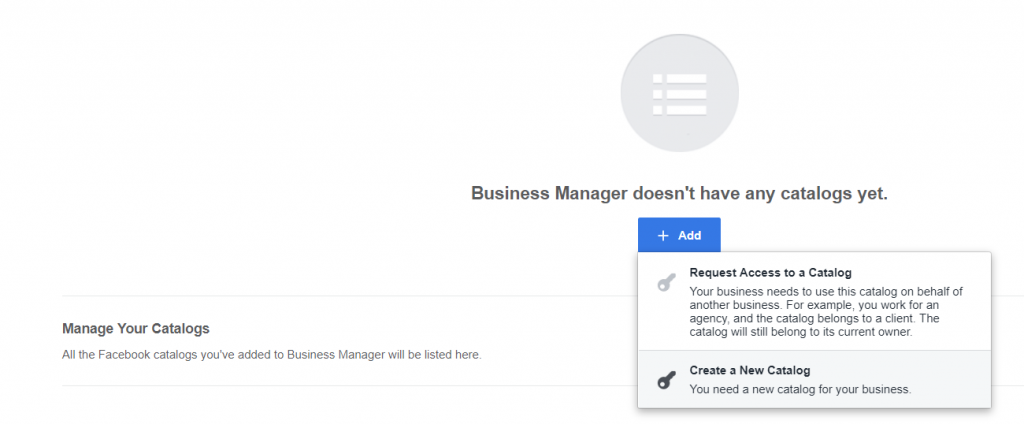
Choose Create a new catalog and add the desired information for the products.
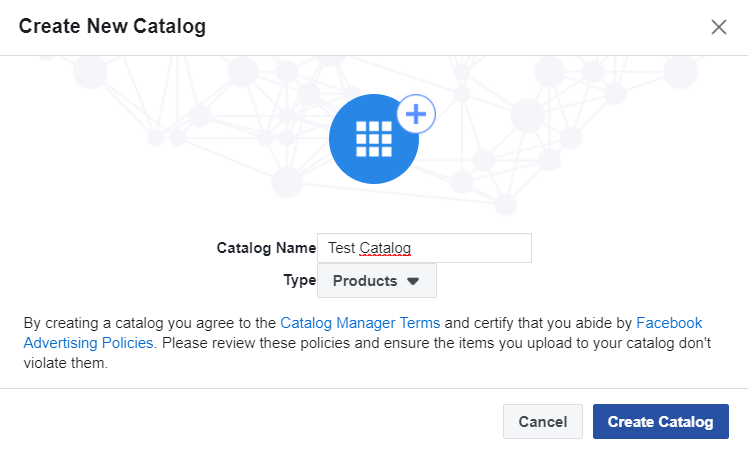
Note: as much as the Business Manager allows for multiple categorizations, some of them may be unavailable in your region. So be sure to check out the Facebook Advertising Policies before you create them.
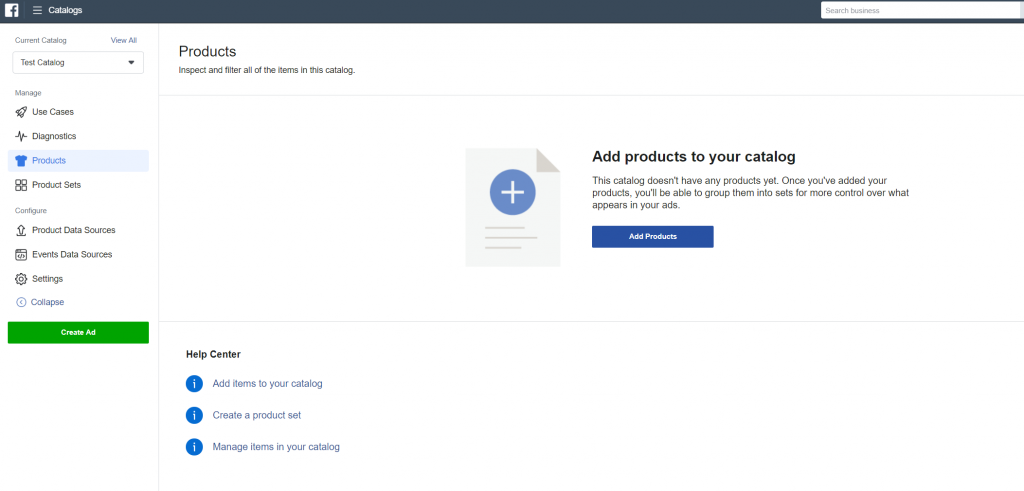
Now it’s time to select the people who will have access to ad and product management within that catalog. When you are done, click Assign and go to the Catalog Manager. Click on the Products in the left menu and it will take you to a blank page. Click the Add Products option right in the center of the screen.
You will be given three options: add manually, use the data feed or with the Facebook pixel connection installed on your e-commerce.
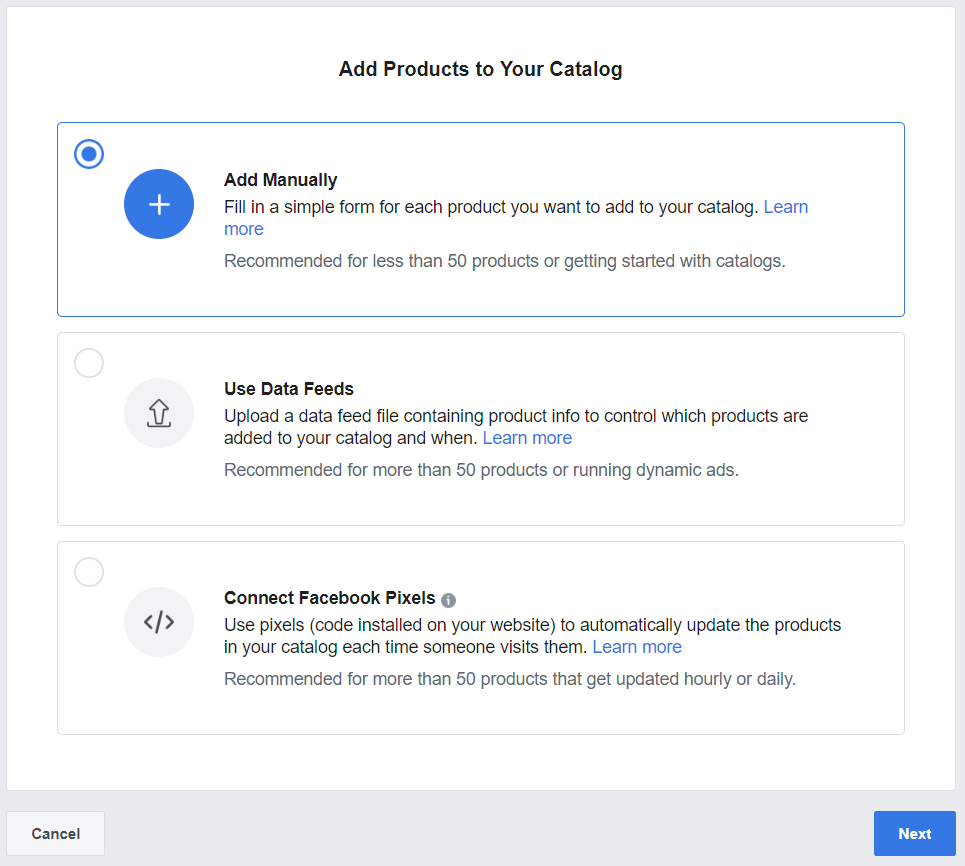
Note: data feed usage is intended for people who have more than 50 products already cataloged. Click “Add Manually” and upload all information about your product, such as the image, name, and description for sale.
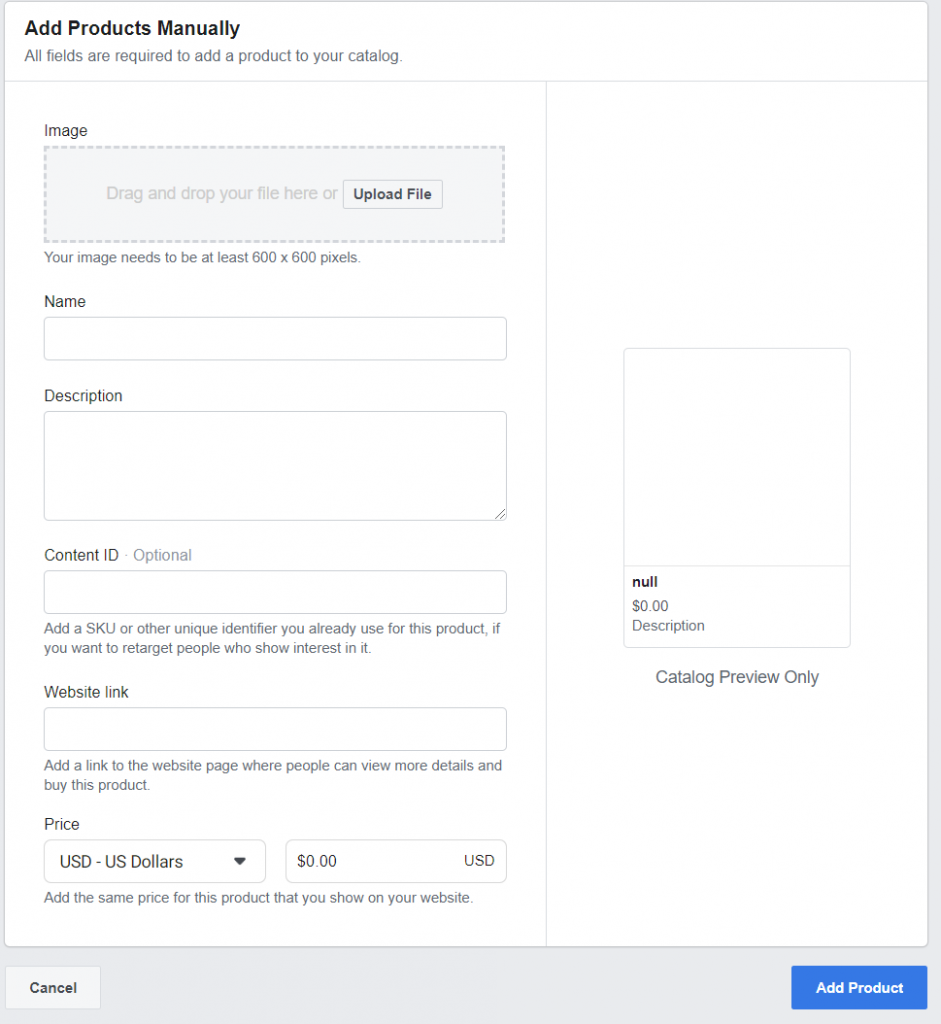
In this step, you can also add the price and link to checkout. Once finished, the catalog manager will give you two options: complete or continue adding new products.
Using a Shopify account
Managing your e-commerce catalog through services like Shopify or BigCommerce is another viable option. For this specific post we will be using Shopify, you can create an account and try it for free for a certain time.
Click on Settings > Sales Channels > Add sales channel to connect your Instagram account.
Once you have connected your social accounts to the service, you will be able to use your Shopify links on Instagram and directly manage your products on Shopify.
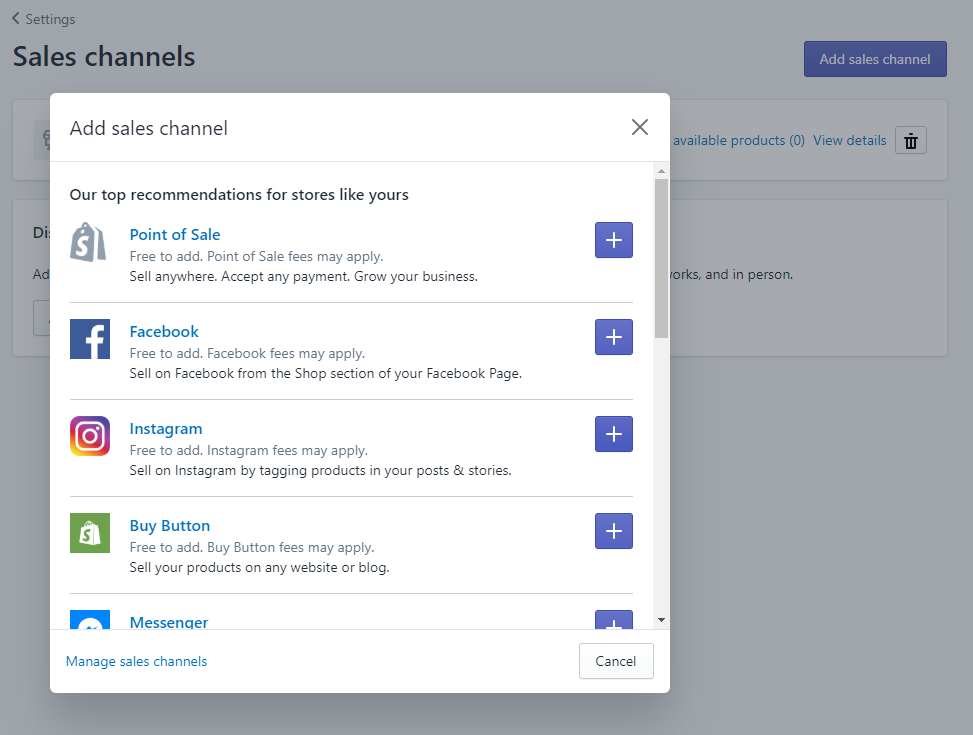
Note: using this method you can create catalogs and upload multiple products at once.
Tagging products on Instagram
By now you should have created a catalog, a few products and probably have the whole thing ready to be reviewed by Instagram.
Open the Instagram app, click on Settings > Business > Sign Up for Shopping.
All set! Your account will now be reviewed by the Instagram team to see if it meets all shopping criteria. The approval process may take up to a couple weeks.
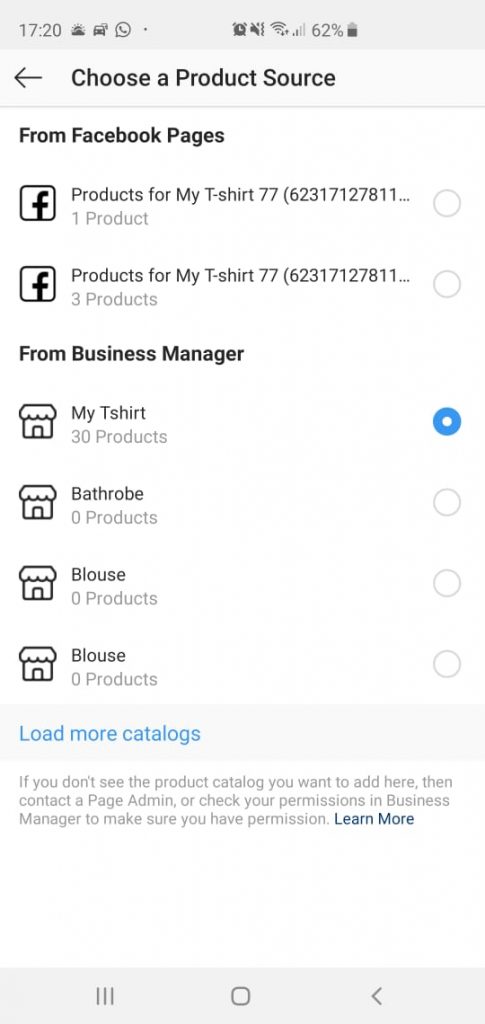
If your account already has this feature, you’ll see the catalogs that have already been created.
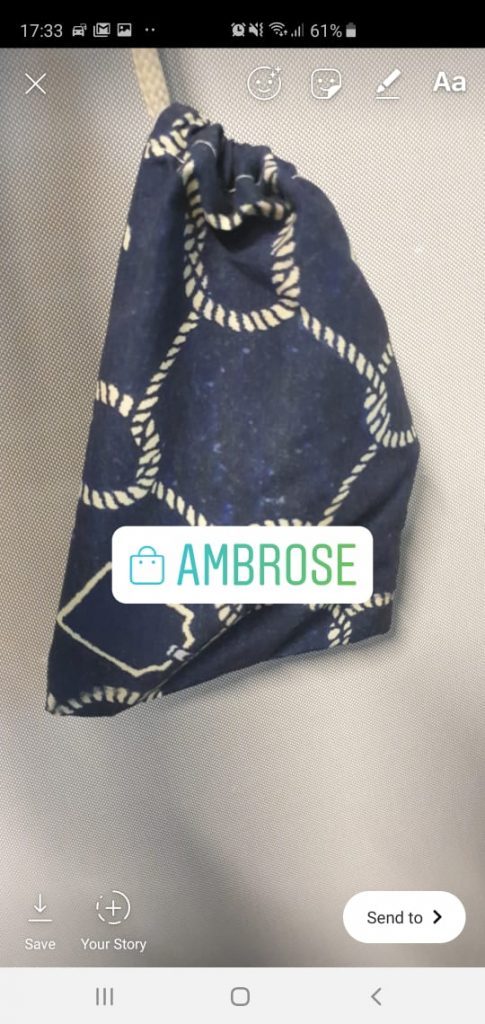
Now go ahead and make a new post, either in Feed or Stories and choose the “Products” tag: it should appear right below the option to tag a location. If you are using Instagram Stories, it will be grouped with the rest of the stickers.
Tips
Note: Instagram Shopping is undergoing a very meticulous process, and if you are rejected, Instagram will not allow further review/appeal.
For now, we don’t know what is the exact criteria for approving a shopping account. Quite possibly, you may do everything Instagram asks for and still fail.
That’s why we’ve broken down some tips that were helpful during our test:
- The Instagram account must be a business account and should be linked to a Facebook page;
- Your Instagram account must have real content and plenty of activity before you can request store review. Post a lot and have real engagement with your followers before making the request. The content of both accounts should be real and well crafted for human reviews;
- Apparently, having physical products as a sales category also counts towards the process;
Conclusion
The whole process may take some time. But believe me, it’s totally worth it. If everything’s in place, your digital strategy will turn your followers into real customer much faster.
What did you think of this post? Do you have any other tips for selling on Instagram?
Let me know in comments down below!